

Lights, camera, chocolate!
There’s a special kind of magic that happens when you snap the perfect shot of a moist chocolate cake fresh from the oven. The way light plays on a glossy ganache or the crumb’s tender texture can make or break the frame. Trust me, capturing that luscious richness isn’t just about aiming and clicking—it’s an art form that demands patience and a keen eye for detail.
Last weekend, I found myself elbow-deep in cocoa dust and camera gear, experimenting with angles while the kitchen filled with the intoxicating scent of baking chocolate. The batter was silky, almost whispering promises of indulgence. As the cakes baked, I prepped my set—old wooden boards, vintage plates, and a scattering of cocoa nibs—to create the perfect moody backdrop that each slice deserves.
Photography isn’t just about showcasing the cake; it’s about telling a story—one that pulls the viewer into that moment of temptation and tactile wonder. Ready to dive deep into the world where baking meets lens? Let’s get snapping.
For a delicious dessert inspiration, check out our Old Fashioned Chocolate Cake: Classic Scratch-Made Cocoa Treat and see how chocolate cake photography brings it to life.
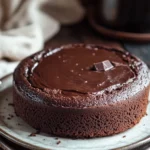
Real Life Wins with This Classic Moist Chocolate Cake
- Hands down—this cake’s moist crumb means no more dry, crumbly disasters when you’re scrambling to bake for last-minute guests.
- Perfect for snapping that drool-worthy pic before everyone attacks it—because yes, it holds up beautifully for dessert tables and social media flexes.
- Got a picky eater in the house? The deep chocolate flavor sneaks past skeptics without a fuss—no weird aftertaste or bitterness here.
- Prep time is lightning fast—20 minutes tops—and you’re still on the couch in under an hour. Great for those unpredictable sweet tooth moments.
- Pro tip: wrap leftovers tight and toss them in the fridge or freezer. This cake plays nice with storage, so you’re never stuck eating stale cake or tossing extras.
Classic Moist Chocolate Cake
- Total Time: 55 minutes
- Yield: 12 1x
Description
A rich and moist chocolate cake perfect for any celebration or dessert craving. This recipe yields a tender crumb and deep chocolate flavor, ideal for photography and indulgence.
Ingredients
1 and 3/4 cups (220 grams) all-purpose flour, sifted
2 cups (400 grams) granulated sugar
3/4 cup (65 grams) unsweetened cocoa powder, sifted
1 and 1/2 teaspoons baking powder
1 and 1/2 teaspoons baking soda
1 teaspoon salt
2 large eggs, at room temperature
1 cup (240 ml) whole milk, at room temperature
1/2 cup (120 ml) vegetable oil
2 teaspoons pure vanilla extract
1 cup (240 ml) boiling water
Instructions
Preheat the oven to 350°F (175°C). Grease and flour two 9-inch (23 cm) round cake pans and line the bottoms with parchment paper.
In a large mixing bowl, whisk together the flour, sugar, cocoa powder, baking powder, baking soda, and salt until well combined.
Add the eggs, milk, vegetable oil, and vanilla extract to the dry ingredients. Beat on medium speed with an electric mixer for 2 minutes until smooth and well combined.
Carefully stir in the boiling water by hand. The batter will be thin; this is normal.
Divide the batter evenly between the prepared cake pans.
Bake for 30 to 35 minutes, or until a toothpick inserted into the center comes out clean.
Remove the cakes from the oven and allow them to cool in the pans for 10 minutes.
Run a knife around the edges to loosen the cakes, then invert them onto wire racks to cool completely.
Once cooled, frost and decorate as desired for photography or serving.
- Prep Time: 20 minutes
- Cook Time: 35 minutes
Explore more:
Dessert Recipes
Mastering the Classic Moist Chocolate Cake
The Secret to That Golden Crust—and Why It Matters
Ever wonder why some chocolate cakes boast that perfect, slightly crisp edge that contrasts so well with a tender crumb? It’s all about the pan prep—and the flour. Sure, we grease and flour those pans religiously, but there’s a trick I swear by: parchment paper. Cutting circles to fit snugly at the bottom doesn’t just prevent sticking—it actually helps the cake bake evenly by insulating the edges a bit. Also, sifted flour and cocoa powder are non-negotiable here. They keep clumps out of the batter, but more importantly, they aerate the mix, which is the unsung hero behind that light-yet-moist texture you crave.
Ingredient Swaps That Won’t Let You Down
Listen up—if you don’t have whole milk on deck, don’t panic. I’ve swapped it out for buttermilk or even sour cream when the pantry was bare. These swaps add an acidic tang that reacts with baking soda, giving an even better rise and a tender crumb. Got olive oil instead of vegetable oil? Use it—but only if it’s mild or light. That robust, peppery stuff will throw your chocolate flavor off balance, and nobody wants that. And heads up—if you go dairy-free, almond or oat milk work fine, but always keep them at room temp. Cold liquids are the silent culprits behind dense cakes. Trust me, I’ve been there.
Fixing the “Oops!” Moments—When Your Cake Isn’t Moist
Dry cake? It happens to the best of us. Here’s the no-BS fix: slice your cake layers in half horizontally and brush each layer with a simple syrup—just equal parts sugar and water boiled until sugar dissolves. Injects moisture and a little sweetness right back in, no questions asked. Overmixing is another rookie mistake—once you add boiling water, stir gently. The batter’s thin, yes, but that’s the magic—for real. Overbeating here scrambles the structure, resulting in a dense brick. Lastly, watch your oven like a hawk. Even a few minutes too long can turn your moist wonder into a dust bowl. An instant-read thermometer can save your sanity; aim for about 210°F internal temp before pulling out.
Classic Moist Chocolate Cake FAQs
A: Absolutely! Just fill your cupcake liners about two-thirds full and bake at 350°F for around 18-22 minutes. Keep a close eye—ovens vary and the toothpick test is your best buddy here.
A: Yes, it is! The boiling water helps bloom the cocoa powder, bringing out that deep chocolate punch and keeps the crumb super tender. Skipping this step? You’re tossing out the secret weapon.
A: Sure thing! Almond, oat, or soy milk all play nice here. Just keep it at room temp to keep the batter consistent and avoid any surprise curdling or texture quirks.
A: Insert a toothpick in the center. If it comes out clean or with just a few moist crumbs, you’re golden. If batter clings to it like it’s clingy ex, pop it back for another 3-5 minutes and check again.
A: Totally! Bake, cool, then wrap it tight. Refrigerate up to 5 days or freeze for up to 3 months. Thaw in the fridge overnight before frosting. Pro tip: wrapping well prevents that dreaded freezer burn taste.