

Patience wins again.
There’s something almost meditative about watching dough bubble and swell in its quiet corner of the kitchen. The no knead method—a technique that’s as lazy as it is clever—turns flour and water into a crusty loaf with barely a flick of the wrist. I remember the first time I let a no knead dough bathe in the warmth of my countertop for 18 hours; it felt like magic was afoot, not just baking.
Using a Dutch oven isn’t just about tradition—it’s about science and showmanship. The heavy lid traps steam, coaxing the dough to spring up with a crackling crust that’s the stuff of bread nerd dreams. No fancy mixers, no intimidating kneading routines—just time and heat.
This bread is proof that sometimes the best results come from doing less, not more. Whether you’re a beginner or a crust-chasing aficionado, the Dutch oven rise method delivers a loaf that speaks for itself—golden, full-bodied, and begging to be torn apart.
If you’re interested in no knead bread Dutch oven rise techniques, check out our guide on How to Make Flavorful Bread Using Your Sourdough Discard Scrap for some great tips.
Real Life Wins From No Knead Dutch Oven Bread
- Forget fancy mixers—just a bowl and a spoon get you there. This recipe’s hands-off vibe means you spend time doing literally anything else while it does its magic.
- A crust that snaps louder than your old vinyl record player. That crackly shell? Courtesy of the Dutch oven’s steamy oven environment that traps moisture just right.
- Perfect for novice bakers who want to skip the drama of kneading but still score a legit artisan loaf. If I can nail this on a sleepy Sunday morning, trust me—you can too.
- The long, slow rise builds flavor without adding any extra hassle; it’s like bread that’s had time to gossip in the fridge overnight and come out richer for it.
- Saving the day for last-minute guests—prep the dough the night before, bake fresh bread the next day, and look like the host with the most without breaking a sweat.
No Knead Bread with Dutch Oven Rise
- Total Time: 18 hours 0 minutes
- Yield: 8 slices 1x
Description
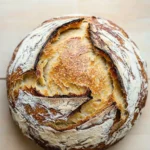
This no knead bread recipe yields a crusty, artisan-style loaf with minimal effort. Using a Dutch oven for baking creates a perfect rise and a golden, crispy crust. Ideal for beginners and bread lovers alike.
Ingredients
3 cups (360 grams) all-purpose flour
1/4 teaspoon instant yeast
1 1/4 teaspoons salt
1 1/2 cups (360 ml) warm water (about 110°F / 43°C)
1 tablespoon cornmeal (for dusting)
Instructions
In a large mixing bowl, combine the all-purpose flour, instant yeast, and salt. Stir to mix evenly.
Add the warm water to the dry ingredients and stir with a wooden spoon or spatula until a shaggy dough forms. The dough will be sticky and rough.
Cover the bowl tightly with plastic wrap or a clean kitchen towel and let the dough rest at room temperature for 12 to 18 hours, until the surface is dotted with bubbles and the dough has doubled in size.
After the dough has risen, generously flour a clean work surface and scrape the dough onto it.
With floured hands, fold the dough over on itself once or twice to shape it into a rough ball. Do not knead.
Place a large piece of parchment paper on the work surface and sprinkle it with cornmeal. Transfer the dough ball onto the parchment paper, seam side down. Cover loosely with a kitchen towel and let it rise for 1 to 2 hours, until it has almost doubled in size.
About 30 minutes before the dough is ready, place a 5 to 6-quart Dutch oven with its lid inside your oven and preheat to 450°F (232°C).
Carefully remove the hot Dutch oven from the oven. Using the parchment paper, lift the dough and place it into the Dutch oven. Cover with the lid.
Bake the bread covered for 30 minutes.
Remove the lid and bake for an additional 15 minutes, until the crust is deep golden brown.
Use tongs or oven mitts to carefully remove the bread from the Dutch oven. Transfer it to a wire rack and let it cool completely before slicing.
- Prep Time: 15 minutes
- Cook Time: 45 minutes
Explore more:
Breakfast Recipes
No Knead Bread with Dutch Oven Rise: Tricks and Tweaks
The Secret to That Golden Crust
Here’s the skinny—your Dutch oven is the unsung hero. When you preheat that heavy pot to a scorching 450°F, it becomes a mini steam chamber once the dough hits the hot surface. The lid traps moisture, preventing the crust from setting too fast, letting the bread puff up like it’s had a swell night’s sleep. Thirty minutes covered, then a quick strip of the lid for a final 15-minute blast: that’s your crust’s grand finale. No fancy steam spritz needed. It’s like magic, but really just physics and heat doing their well-rehearsed dance.
Ingredient Swaps: Not Just Flour Power
All-purpose flour is your base camp here, but don’t hesitate to play the field. Swap in bread flour for an extra chewy crumb—that higher protein content does wonders for gluten without the elbow grease. No bread flour? No sweat—whole wheat adds earthiness but expect a denser loaf. Pro tip: toss in a tablespoon of vital wheat gluten if you’re working with whole grain flours, or you might end up with a brick masquerading as bread. Cornmeal for dusting? It’s not just decorative—it gives your loaf a rustic base and prevents sticking. If cornmeal’s MIA, semolina can crash the party with a bit of extra crunch on the bottom.
Fixing the Common Flops—When Your Dough Won’t Play Nice
Sticky mess got you down? Remember, no kneading means embracing the stickiness—it’s part of the charm. But if your dough feels more glue than dough, a sprinkle of flour on your hands and the work surface can calm it down without turning it into a rock. Too dense? Your yeast might be on vacation—check that water temperature; 110°F is the sweet spot to wake the yeast without a burnout. Rising times aren’t set in stone—if your dough hasn’t doubled after 18 hours, give it more time or find a warmer nook (think: near a radiator or oven light). On the flip side, if your dough is overproofed, it’ll look bubbly and fragile—handle gently and shorten the second rise to avoid pancake loaf. Baking with a cold Dutch oven? Rookie move—preheat that beast or kiss your rise goodbye!
No Knead Bread FAQs
A: Yes! The Dutch oven traps steam while baking, creating that crusty exterior and perfect rise you’re after. It’s like magic in a pot.
A: I wouldn’t recommend it. The long 12 to 18 hour rise at room temp develops flavor and texture that you just can’t rush. Think of it as slow-cooking your bread’s personality.
A: The cornmeal dusting prevents sticking and adds a subtle crunch to the crust’s bottom. It’s a small detail that makes a noticeable difference—old school baker’s trick.
A: Yes, but you’ll need to proof it first in warm water. Instant yeast is the plug-and-play option here, no fuss.
A: Nope. Let the loaf cool completely on a wire rack. Slicing too soon turns your crust into sad, gummy mush. Patience pays off!