
There’s something incredibly satisfying about bread that comes together without the usual elbow grease. I remember the first time I tried no knead bread dough—it felt like cheating, honestly. Just mix, wait, and bake. No slap-and-fold marathon, no flour-covered kitchen battleground. The dough is shaggy and sticky, nothing like the smooth, polished balls you get from kneading. But give it time—12 hours or so—and magic happens. Bubbles appear, the dough doubles, and you know you’re onto something good. It’s a slow dance rather than a sprint, perfect for those who want fresh bread without turning the kitchen into a flour warzone. The warm water wakes the yeast gently, and salt plays its quiet but crucial role, balancing the flavors while letting the dough rise at its own pace. Baking this bread in a preheated Dutch oven traps steam, creating that legendary crust—that crackly armor that makes slicing so addictive. As it cools on the rack, your kitchen fills with that earthy, homey aroma that reminds me why sometimes the best things in life require just a little patience and zero fuss. If you’re looking to bend the rules of traditional bread baking without sacrificing taste or texture, this no knead bread dough recipe is your new go-to. Trust me, once you go no knead, you’ll never knead to knead again.
If you’re all about easy meals with maximum flavor and minimal cleanup, you’ll love this One Pot Garlic Chicken recipe next. It’s got crispy skin and tender thighs, perfect for a cozy dinner after you’ve mastered that no knead bread dough!
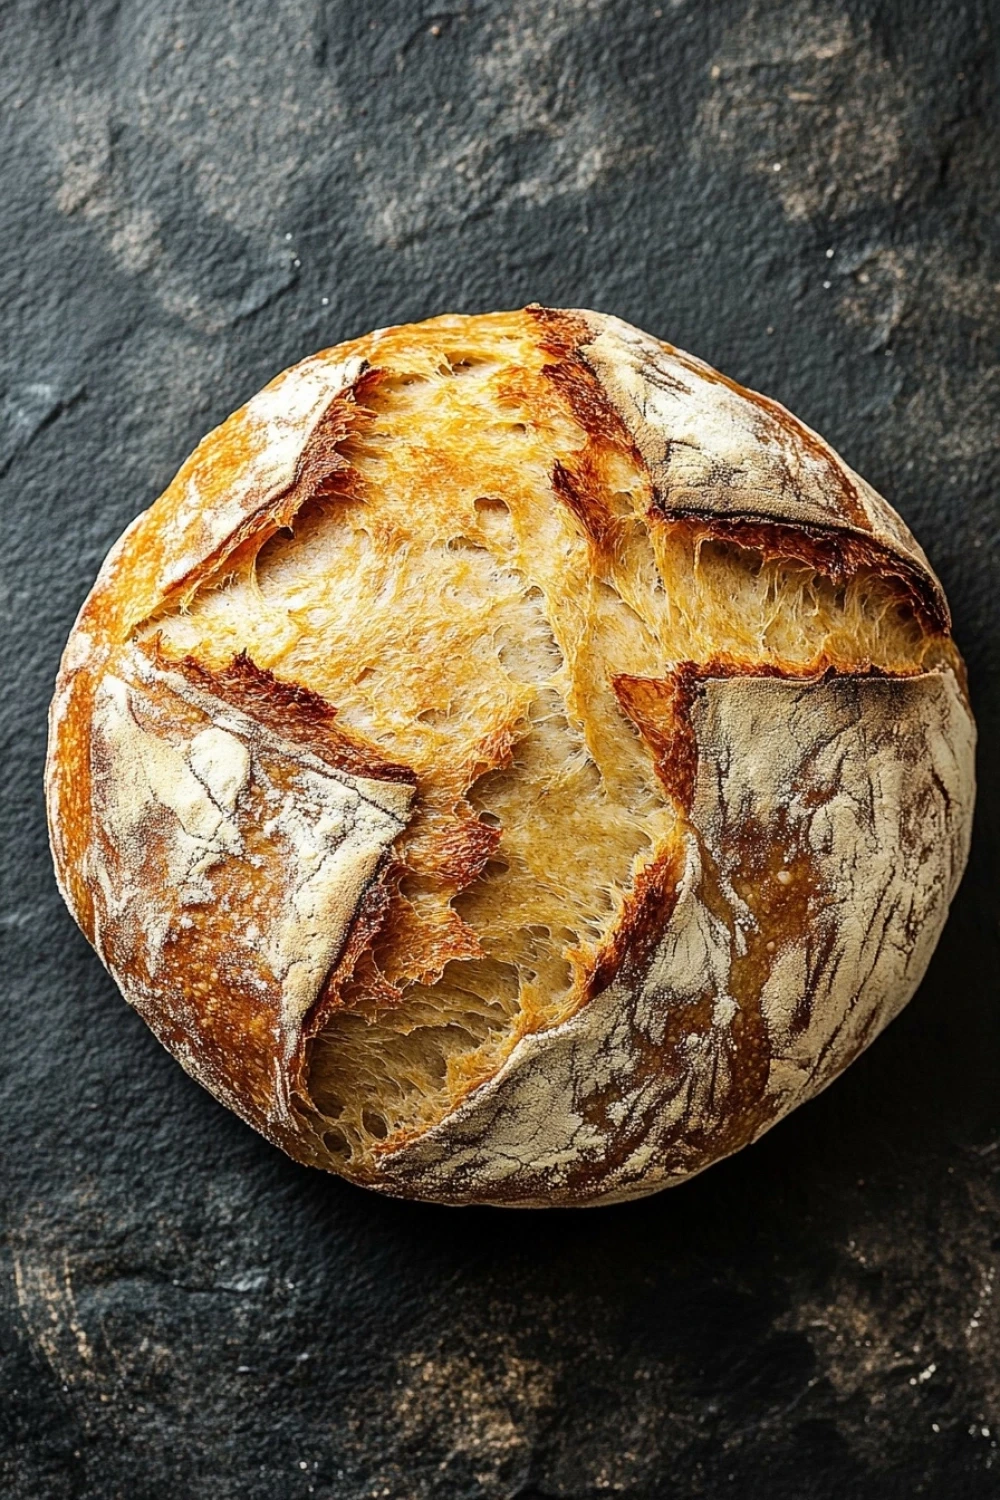
Why I Keep Coming Back to No Knead Bread Dough
- Hands-off magic — toss ingredients together, then let time do the heavy lifting while you get on with life.
- Minimal equipment and zero muscle power required — perfect for when you’re fresh out of energy or just hate kneading.
- Crust that snaps with attitude, thanks to the overnight fermentation that amps up flavor without extra effort.
- Flexible timing — the long rest means you can prep in the evening and wake up to fresh bread, no alarm clock needed.
- Simple pantry staples only — no fancy flour blends or weird additives messing with your loaf, just basics doing their thing.

No Knead Bread Dough
Total Time: 12 hours 40 minutes
Yield: 1 loaf 1x
Description
A simple and easy no knead bread dough recipe that requires minimal effort and yields a delicious, crusty homemade bread.
Ingredients
Scale
3 cups (360 grams) all-purpose flour
1/4 teaspoon instant yeast
1 1/4 teaspoons salt
1 1/2 cups (360 milliliters) warm water (about 75°F/24°C)
Instructions
In a large mixing bowl, combine the all-purpose flour, instant yeast, and salt. Stir to mix evenly.
Add the warm water to the dry ingredients and stir with a wooden spoon or spatula until a shaggy, sticky dough forms. Ensure all flour is incorporated.
Cover the bowl tightly with plastic wrap or a clean kitchen towel and let the dough rest at room temperature for 12 to 18 hours, until the surface is dotted with bubbles and the dough has doubled in size.
Lightly flour a clean work surface and turn the dough out onto it. With floured hands, fold the dough over itself once or twice to shape it into a rough ball.
Place the dough seam side down on a piece of parchment paper. Cover loosely with a kitchen towel and let it rest for 1 to 2 hours, until it has doubled in size again.
About 30 minutes before baking, preheat your oven to 450°F (230°C). Place a heavy covered pot (such as a Dutch oven) inside the oven to heat.
Carefully remove the hot pot from the oven. Using the parchment paper, lift the dough and place it into the pot. Cover with the lid.
Bake the dough covered for 30 minutes. Then remove the lid and bake for an additional 15 to 20 minutes, until the bread is golden brown and crusty.
Remove the bread from the pot and let it cool completely on a wire rack before slicing.
- Prep Time: 10 minutes
- Cook Time: 30 minutes
Explore more:
Breakfast Recipes
No Knead Bread Dough: Mastering Substitutions and Fixes
Substitution Secrets
When you’re knee-deep in a no knead bread project and suddenly find yourself out of a key ingredient—don’t panic. Flour is the backbone here, and swapping it out can be trickier than it seems. All-purpose flour works beautifully, but if you’re itching for a twist, bread flour is your pal for a chewier crust and a bit more rise thanks to its higher protein content. Whole wheat flour? It’s a live wire—adds a nutty edge but can make your dough denser, so mix it half-and-half with all-purpose to keep things balanced.
Instant yeast is the quiet workhorse in this recipe. If you only have active dry yeast on hand, you’ll need to proof it first—warm water, a pinch of sugar, and 5-10 minutes until it foams up. Don’t toss it straight in dry; yeast is like a diva that way.
Salt? Don’t skimp. It’s not just for flavor; it tightens gluten strands and controls yeast activity. If you must cut back, do it sparingly, or risk a bland, flat loaf. And water temperature is no joke—too hot, and you murder your yeast; too cold, and it drags its feet.
The Science
Here’s the lowdown on what’s happening beneath the crusty surface. This recipe banks on the magic of time. That long, slow ferment—12 to 18 hours—is the secret sauce. It lets the yeast do a gentle waltz, munching on flour’s starches, releasing CO2 bubbles that puff the dough up and develop flavor without the elbow grease of kneading.
The dough’s stickiness is a sign of high hydration—a wetter dough means bigger air pockets inside your loaf. Think of it as the difference between a dense brick and a loaf with a spongy crumb that pulls apart like a dream.
When you drop your dough into a hot Dutch oven, you’re creating a mini steam chamber. Steam keeps the crust from setting too soon, allowing the bread to expand fully and develop that signature blistered, crackly crust. It’s like giving your loaf a sauna before the grand debut.
Real-world Fix
Let me spill a little tale. One time, I forgot to cover my dough overnight—rookie mistake. By morning, it had developed a weird, slightly sour tang and a much tighter crumb. The fix? I tossed in a pinch more yeast the next round and made sure the dough was properly sealed against air. Now, I swear by plastic wrap or a damp towel as my dough’s BFF.
Another hiccup: dough that refuses to rise. Sometimes your yeast is past its prime, or the water’s too chilly. If your dough is sluggish, warm it up—pop the bowl somewhere cozy, like near a radiator or atop your fridge—and give it time. Patience is your best friend here.
And if your bread comes out pale and soft, it’s usually the oven temp or baking time—don’t skimp on the preheat or that Dutch oven’s heat; they’re the heavy hitters for crust development.
No knead bread is forgiving but demands respect for timing and temperature. The joy? Less fuss, more magic.
Got Questions About No Knead Bread? Here’s the Scoop!
How does no knead bread dough get that amazing crust without kneading?
It’s all about time and hydration. The long rest allows gluten to develop slowly, and the high moisture content steams the bread inside the hot covered pot, creating a crispy crust—no elbow grease needed.
Can I speed up the rising time if I’m short on patience?
Sure, but it’s a trade-off. Warmer temps speed yeast activity, so rest your dough in a slightly warmer spot—around 80°F (27°C). Just keep a close eye; too warm and you risk overproofing, which can wreck the texture.
Why use a Dutch oven or heavy covered pot for baking?
The heavy pot traps steam from the dough as it bakes, mimicking a professional steam-injected oven. This steamy environment is key for that crackly crust and soft, chewy inside. No pot? Try a rimmed baking sheet with a pan of boiling water in the oven.
Can I substitute whole wheat flour or other flours in this recipe?
You can—just expect a denser loaf. Whole wheat absorbs more water, so add a bit more warm water to keep the dough sticky. Also, the rising time might be longer since whole wheat flour can weigh down gluten development.
How do I know when the bread is fully baked besides checking color?
Tap the bottom of the loaf once it’s out of the pot—if it sounds hollow, you’re good to go. Also, internal temperature should hit around 200°F (93°C) if you want to be exact. Patience here pays off—let it cool completely before slicing!