
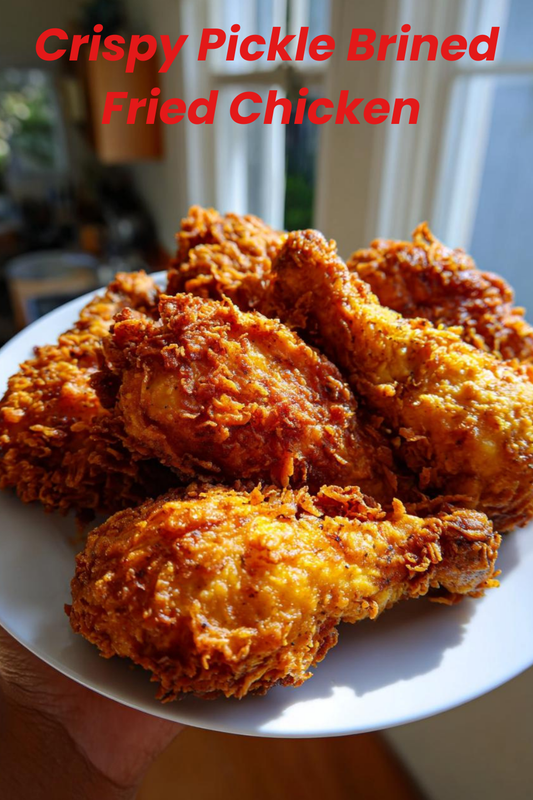
As a busy mom, I know how challenging it can be to whip up a meal that pleases everyone. That’s why I’m excited to share my recipe for Pickle Brined Fried Chicken! This dish is not just a quick solution for a hectic weeknight; it’s a delightful way to impress your loved ones with minimal effort. The magic of pickle brining infuses the chicken with a tangy flavor that’s simply irresistible. Trust me, once you try this crispy, juicy fried chicken, it will become a staple in your kitchen!
Why You’ll Love This Pickle Brined Fried Chicken
This Pickle Brined Fried Chicken is a game-changer for busy families. It’s incredibly easy to prepare, requiring just a few simple steps. The brining process not only tenderizes the chicken but also adds a burst of flavor that will have everyone asking for seconds. Plus, it cooks up quickly, making it perfect for those nights when time is tight but you still want to serve something delicious!
Ingredients for Pickle Brined Fried Chicken
Gathering the right ingredients is key to making the best Pickle Brined Fried Chicken. Here’s what you’ll need:
- Chicken Thighs and Drumsticks: These cuts are juicy and flavorful, perfect for frying. You can also use chicken breasts if you prefer leaner meat.
- Pickle Juice: The star of the show! It tenderizes the chicken and adds a zesty kick. Use your favorite dill pickle juice for the best flavor.
- Buttermilk: This creamy ingredient helps the flour coating stick and adds richness. If you don’t have buttermilk, you can make a quick substitute by mixing milk with a splash of vinegar.
- All-Purpose Flour: Essential for that crispy coating. You can swap it for gluten-free flour if needed.
- Garlic Powder: Adds a savory depth to the flavor. Fresh garlic can be used, but it may alter the texture.
- Onion Powder: Complements the garlic and enhances the overall taste.
- Paprika: This spice gives a lovely color and a hint of smokiness. You can use smoked paprika for an extra flavor boost.
- Black Pepper and Salt: Basic seasonings that elevate the dish. Adjust to your taste preferences.
- Vegetable Oil: For frying, choose an oil with a high smoke point, like canola or peanut oil, to achieve that perfect crispy texture.
For exact measurements, check the bottom of the article where you can find everything listed for easy printing!
How to Make Pickle Brined Fried Chicken
Step 1: Brine the Chicken
Start by placing your chicken thighs and drumsticks in a large bowl. Pour in the pickle juice, ensuring the chicken is fully submerged. Cover the bowl and let it chill in the fridge for at least four hours, or overnight if you can. This step is crucial for that juicy, flavorful chicken!
Step 2: Prepare the Buttermilk Coating
Once your chicken has brined, it’s time to prepare the buttermilk coating. In a separate bowl, pour in the buttermilk and add the chicken pieces. Make sure each piece is well-coated. This creamy layer helps the flour stick and adds richness to the fried chicken.
Step 3: Mix the Flour and Spices
In another bowl, combine the all-purpose flour, garlic powder, onion powder, paprika, black pepper, and salt. Whisk them together until evenly mixed. This flavorful blend will create that irresistible crispy coating we all love!
Step 4: Dredge the Chicken
Now comes the fun part! Take each piece of buttermilk-coated chicken and dredge it in the flour mixture. Make sure to coat it thoroughly, shaking off any excess flour. This step is key to achieving that crunchy texture that makes pickle brined fried chicken so delightful.
Step 5: Heat the Oil
In a deep skillet, heat vegetable oil over medium-high heat. You want enough oil to submerge the chicken halfway. To test if the oil is hot enough, drop a small pinch of flour into the oil. If it sizzles, you’re ready to fry!
Step 6: Fry the Chicken
Carefully place the dredged chicken pieces into the hot oil, working in batches if necessary. Fry them for about 12-15 minutes, turning occasionally, until they are golden brown and cooked through. The aroma will be heavenly, and your family will be eagerly waiting!
Step 7: Drain and Serve
Once cooked, remove the chicken from the oil and place it on a wire rack to drain excess oil. This helps keep the chicken crispy. Serve it hot, and watch as everyone digs in! Your pickle brined fried chicken is now ready to be enjoyed!
Tips for Success
- For maximum flavor, brine the chicken overnight.
- Ensure the oil is hot enough before frying to achieve that perfect crispy texture.
- Don’t overcrowd the skillet; fry in batches for even cooking.
- Let the fried chicken rest on a wire rack, not paper towels, to keep it crispy.
- Feel free to adjust spices in the flour mixture to suit your taste!
Equipment Needed
- Large Bowl: For brining the chicken. A mixing bowl works too.
- Deep Skillet: Essential for frying. A Dutch oven can be a great alternative.
- Wire Rack: For draining excess oil. You can use a baking sheet lined with paper towels if needed.
- Meat Thermometer: To ensure chicken is cooked through. A simple knife can also help check doneness.
Variations
- Spicy Pickle Brined Fried Chicken: Add cayenne pepper or hot sauce to the pickle juice for a fiery kick.
- Herb-Infused Brine: Toss in fresh herbs like rosemary or thyme into the pickle juice for an aromatic twist.
- Gluten-Free Option: Substitute all-purpose flour with a gluten-free flour blend for a deliciously crispy coating.
- Oven-Baked Version: For a healthier take, bake the coated chicken at 400°F for 25-30 minutes instead of frying.
- Buttermilk Alternatives: Use dairy-free milk mixed with vinegar for a vegan-friendly buttermilk substitute.
Serving Suggestions for Pickle Brined Fried Chicken
- Classic Coleslaw: A crunchy, tangy side that complements the chicken perfectly.
- Biscuits: Fluffy biscuits are a delightful addition to soak up any juices.
- Sweet Tea: A refreshing drink that balances the savory flavors.
- Pickles: Serve extra pickles on the side for that extra zing!
- Presentation: Arrange the chicken on a rustic platter for a charming touch.
FAQs about Pickle Brined Fried Chicken
Can I use other cuts of chicken for this recipe?
Absolutely! While I love using thighs and drumsticks for their juiciness, you can use chicken breasts or even wings. Just remember that cooking times may vary, so keep an eye on them!
How long should I brine the chicken?
For the best flavor, I recommend brining the chicken for at least four hours. However, if you have the time, letting it sit overnight will really enhance the taste and tenderness of your pickle brined fried chicken.
What can I do with leftover pickle juice?
Don’t toss that pickle juice! It’s perfect for marinating other meats or even adding to salad dressings. You can also use it to make a tangy potato salad or as a brine for vegetables.
Can I make this recipe in advance?
Yes! You can brine the chicken a day ahead and keep it in the fridge. Just coat and fry it when you’re ready to serve. It’s a great way to save time on busy weeknights!
What should I serve with pickle brined fried chicken?
This crispy delight pairs wonderfully with classic sides like coleslaw, mashed potatoes, or cornbread. A refreshing sweet tea or lemonade makes for a perfect drink to complement the meal!
Final Thoughts
Making Pickle Brined Fried Chicken is more than just cooking; it’s about creating memories around the dinner table. The crispy, juicy chicken brings smiles and satisfaction, turning an ordinary meal into a special occasion. I love how this recipe combines simplicity with bold flavors, making it a go-to for busy nights or family gatherings. Plus, the joy of watching my loved ones savor each bite is priceless. So, roll up your sleeves, embrace the brine, and let this delightful dish bring warmth and happiness to your home!
Print
Pickle Brined Fried Chicken: Crispy, Juicy, Irresistible!
- Total Time: 4 hours 45 minutes
- Yield: 4 servings 1x
- Diet: Gluten Free
Description
A deliciously crispy and juicy fried chicken recipe that is brined in pickle juice for an irresistible flavor.
Ingredients
- 4 chicken thighs
- 4 chicken drumsticks
- 2 cups pickle juice
- 1 cup buttermilk
- 1 cup all-purpose flour
- 1 teaspoon garlic powder
- 1 teaspoon onion powder
- 1 teaspoon paprika
- 1 teaspoon black pepper
- 1 teaspoon salt
- Vegetable oil for frying
Instructions
- In a large bowl, combine chicken thighs and drumsticks with pickle juice. Cover and refrigerate for at least 4 hours or overnight.
- Remove chicken from the brine and pat dry with paper towels.
- In another bowl, mix buttermilk with the chicken, ensuring it is well coated.
- In a separate bowl, combine flour, garlic powder, onion powder, paprika, black pepper, and salt.
- Dredge the buttermilk-coated chicken in the flour mixture until fully coated.
- Heat vegetable oil in a deep skillet over medium-high heat.
- Fry the chicken in batches until golden brown and cooked through, about 12-15 minutes per batch.
- Remove chicken and place on a wire rack to drain excess oil.
- Serve hot and enjoy your crispy pickle brined fried chicken!
Notes
- For extra flavor, let the chicken brine overnight.
- Adjust the spices in the flour mixture to your taste.
- Ensure the oil is hot enough before frying to achieve a crispy texture.
- Prep Time: 15 minutes
- Cook Time: 30 minutes
- Category: Main Course
- Method: Frying
- Cuisine: American
Nutrition
- Serving Size: 1 piece
- Calories: 400
- Sugar: 1g
- Sodium: 800mg
- Fat: 25g
- Saturated Fat: 5g
- Unsaturated Fat: 15g
- Trans Fat: 0g
- Carbohydrates: 20g
- Fiber: 1g
- Protein: 30g
- Cholesterol: 100mg
Keywords: Pickle Brined Fried Chicken, Fried Chicken, Crispy Chicken, Juicy Chicken